library(usethis)
usethis::create_github_token()Downloading tools and using github
In class we will use R, Rstudio (now Posit), and git (via github). We will use R in class to “do” statistics. R is a free, open-source program that is widely used in academia and industry (learning it is a CV or resume skill). It is command-line based, which may be different if you are used to point-and-click programs (graphical user interfaces), but that allows it to be easily saved and shared. We will also store R and related files in multiple places using a process called version control; specifically, we will use github to accomplish this.
Below are notes to help you download these and get started. Bryan (2017) and Bryan (n.d.) also supply excellent extended introduction and notes.
Required tools
- Get access to R!. You can make an account at posit Cloud (formerly Rstudio Cloud) (https://posit.cloud/). You can also install R (https://cran.r-project.org/) and Rstudio (https://www.rstudio.com/) on your machine, but I strongly recommend starting with Posit cloud. Rstudio cloud is free for up to 25 hours/month, you don’t have to maintain it, and it gives gives a standard install (same on all machines, so your intro/ our training may be smoother). You can also do both. If you need help, videos are at :
- Join the github classroom we’ll be using for our sessions
- look for email from Blackboard!
- When you visit the page it will ask you to connect or create a github repository. You can use any name (be anonymous or not) that you want. This is a free process.
Cloning a repository
After you join the github classroom, you’ll make a clone of the assignment repository. You can do this on Positcloud or an installed version of Rstudio. I recommend starting with posit Cloud and focus on that process here. First, open Posticloud in one tab/window on your browser (and log in). Next, open github on another tab/window.
Then, find your copy of the repository on github. You can follow the github classroom link again, or log into github and then visit https://github.com/settings/repositories. Find the repository connected to the assignment. You can go to go to https://github.com/settings/repositories to look for it (you’ll need to sign in to github). For github classroom assignments, the repository will be called assignment_name_YOURGITHUBUSERNAME. Click on it to open the repository page.

This will take you to your repository page. This is a also a chance to note you may want to sync the fork - this catches your copy up to any changes I have made in the assignments or associated files.
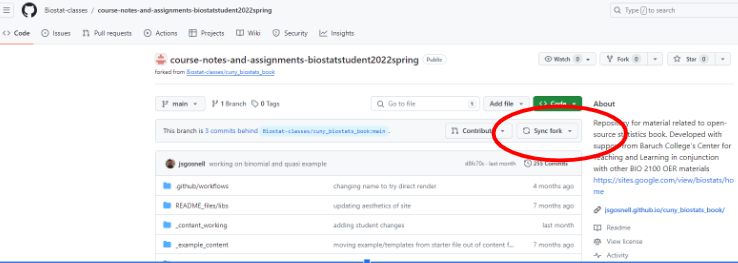
What’s the difference between clone and fork? Click on the grey triangle
A clone of repository is directly linked up to the original repository. Changes made in one will be pushed or pulled to the others. A fork is different in that it can’t directly communicate. Instead, changes can be synced up using pull requests. github also makes it easy to sync them using the button shown above. Github classroom forks the assignments for each of you, then you makes clones of the forks to work on posit Cloud or your machines.
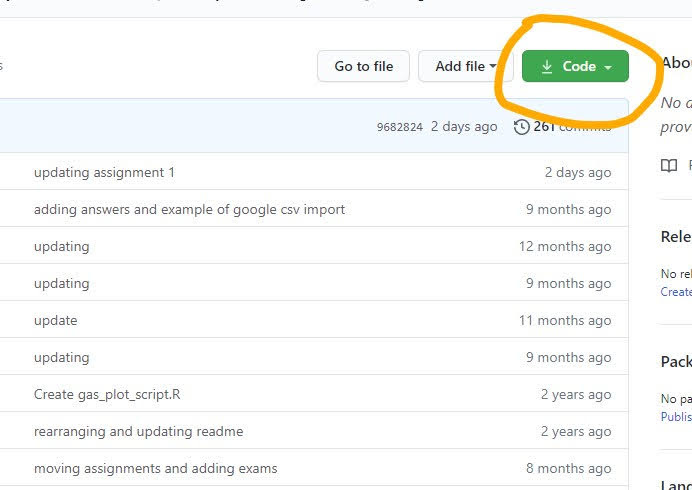
From the repository page, you need to get the url to copy (or clone) the repository. To do this, click on the green Code button from the github page for your repository. Copy the web url (or click the copy icon, two overlapping squares).
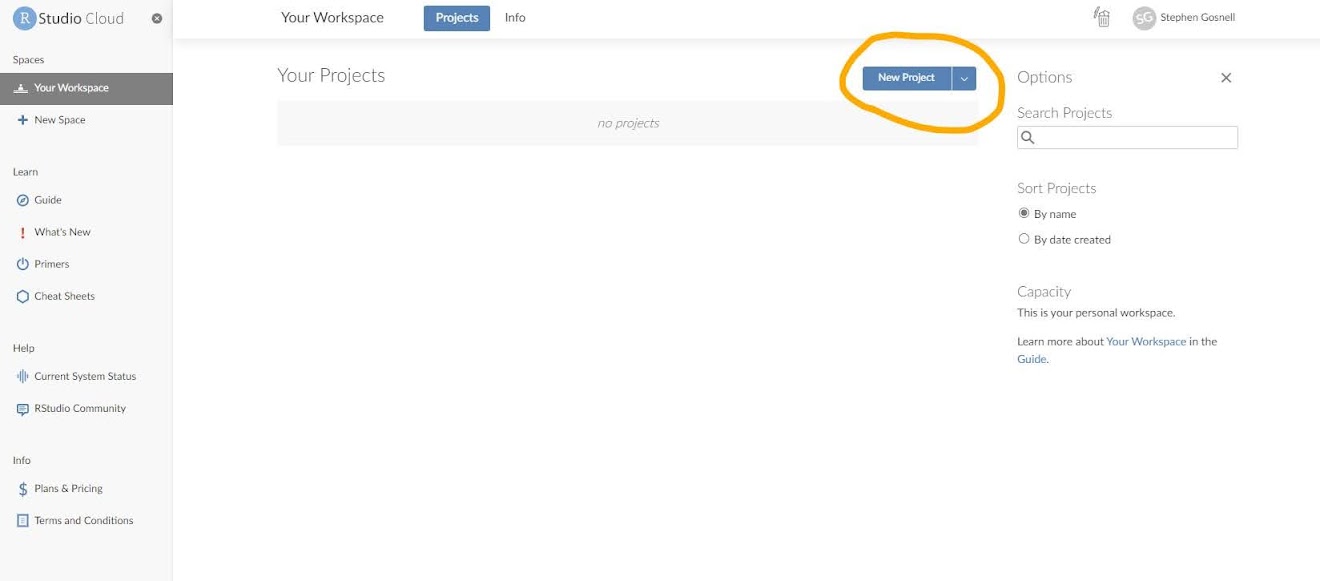
Now go to the PositCloud tab. Select New Project, New Project from Github repo. You’ll need to enter the url for your github repository (what you copied). Press enter and the project will deploy.
The next screen will bring you to a “normal” RStudio screen. We’ll come back to this in the first class or two!
If you are using RStudio on your desktop (or via a server…anywhere that
looks like an RStudio screen)
Video at Accepting your first github repository (from github classroom) and cloning to Rstudio desktop
To start working on an assignment, open RStudio.
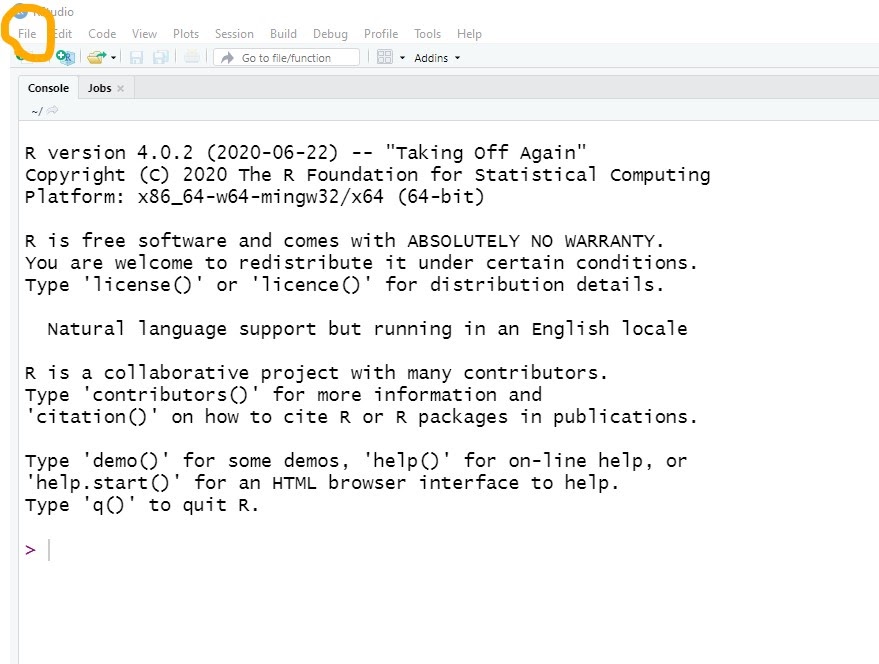
Select file, new project, Version control. On the next screen select git. If this isn’t available, you may need to install git (free) on your system. You can download it at https://git-scm.com/download/.
Next you’ll need to enter the url for your repository. To find this, click on the Code button from the github page for your repository.
Copy the web url (or click the copy icon). Input that into the Rstudio Repository URL space. You can select/edit what you want the repository to be called and where its stored (its just a folder on your computer). For example, I have a Repositories folder in my main hard drive where I save all of these. Then select Create project. Whatever you choose, the project will be saved in new folder in that location using the name you chose. Note you may need to enter your github username and password to create the repository.
You also may get an error/warning about personal access token! this happens at different points on different machines (thus why Rstudio cloud is nice). If you see this now, don’t worry. We’ll cover it (a known issue) in class.
The next screen will bring you to a “normal” RStudio screen. Now we can actually work in R and markdown.
Working in R and with markdown
Now you can start working on the files in the repository in Rstudio. Whether you are in posit Cloud or Rstudio, the basic screen should look the same.
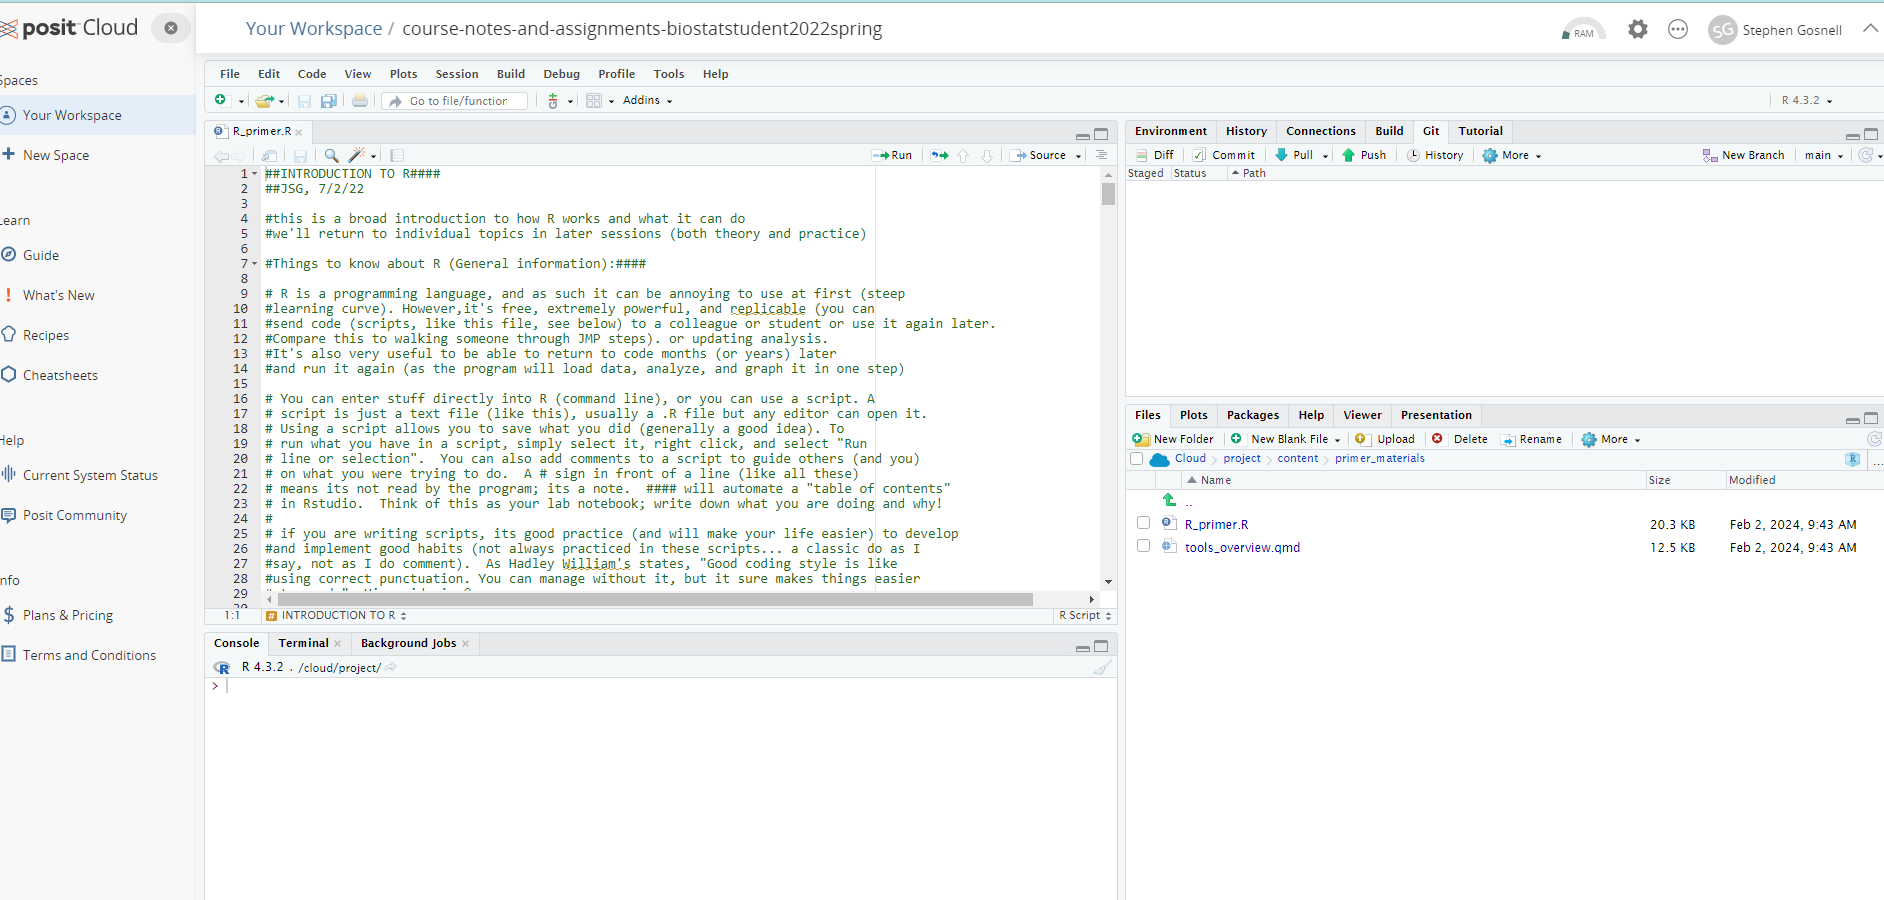
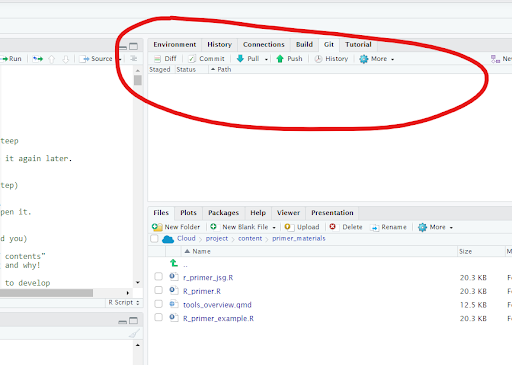
The main screen has 4 quadrants by default (note the upper left may not be there at first!), each with multiple tabs. Color and appearance can be customized until Tools > Options. For now, make sure the upper right quadrant is tabbed to Git. Note the area is empty.
Before you work, make sure you are in the right repository. In posit cloud, the project, or workspace, is shown at the the top of the screen (after Your Workspace). In Rstudio, you should see whatever you named the project in the upper right hand corner. If you don’t go to File > Open Project and navigate to where you placed the repository.
Once you are in the right project, open the file you want to work on. From inside the project space, go to File, Open File and find it, or look in the Files window (lower right quadrant) to find and open the file.

In this example we will copy a file and then edit it to explain saving, commits, and pushing. For example, you can make a copy of the R_primer.R file (the first file we use in class, and the only .R file!). Select the checkbox next to the file, then click the More (gear) button > Make a copy. Then save a copy with your initials.
Editing, committing, and pushing changes
When you did this, the new file now appears in the window under the git tab.
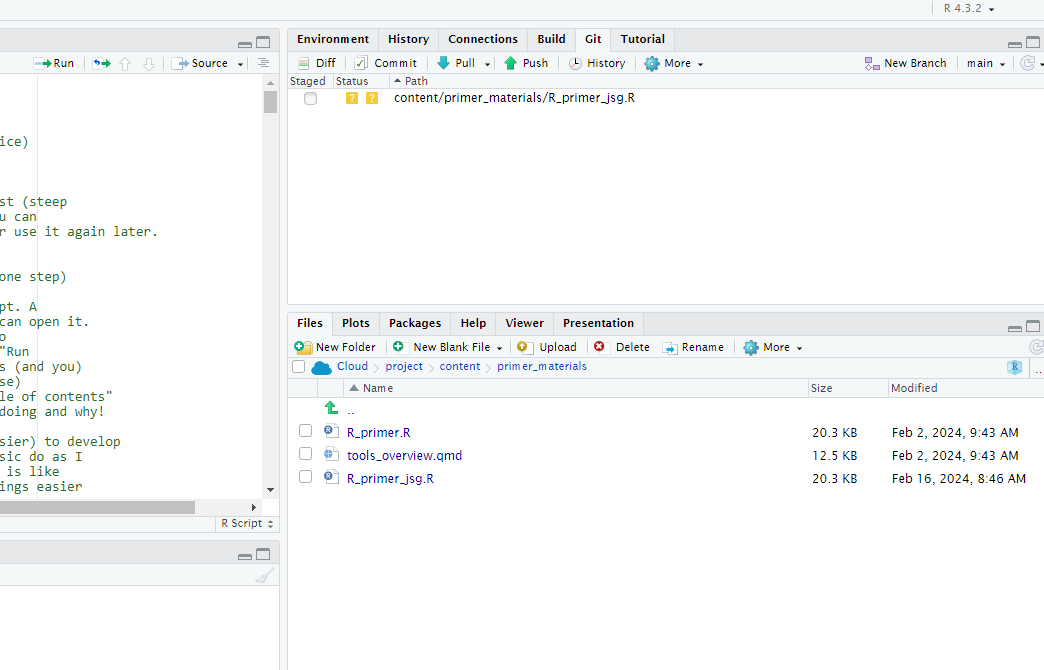
This means you have changed (by updating, adding, or removing) a file but have not committed that change. A commit is different than a save. A save updates a file. A commit takes a snapshot that can be compared to earlier (or later) versions to show you exactly what changed. This is very useful for programs that use text commands (like R), since small errors can cause code to not run. This process is called version control, and it is recommended for use in modern statistics curriculum.
As more businesses, governments, and researchers make analysis-driven decisions, students of statistics and data analysis should be taught how to collaborate with others in managing data, code, and results that are part of a reproducible analysis pipeline. Version control, a system for organizing and tracking changes to files associated with a project (Tichy 1985; Chacon and Straub 2014), has long been recommended for inclusions in the modern statistics curriculum (Nolan and Temple Lang 2010). More recently, both the American Statistical Association (2014) and the National Academy of Sciences (2018) have emphasized that the modern statistics curriculum should teach students project documentation and collaboration.(Fiksel et al. 2019) (terms bolded by me).
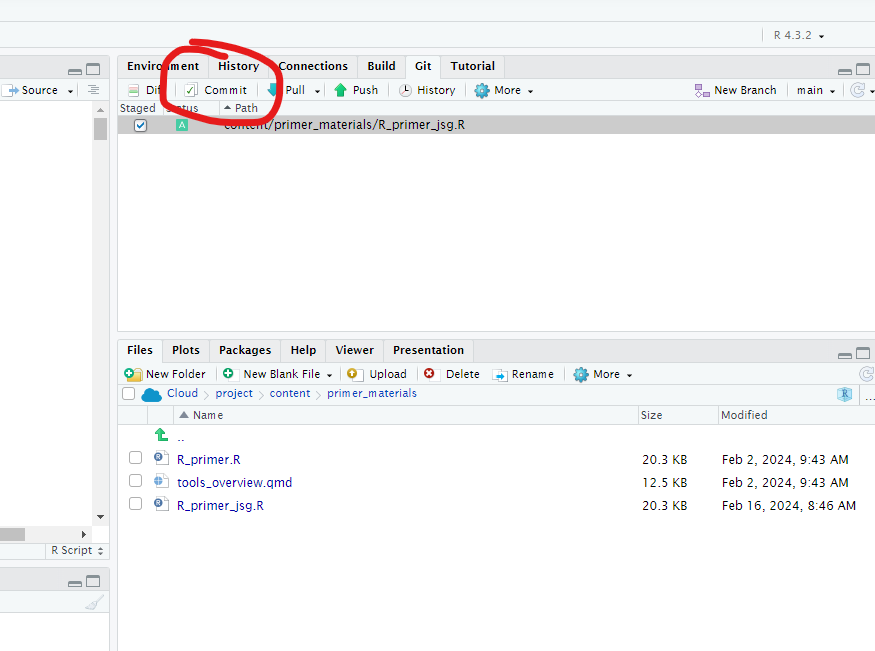
To commit the file, select the checkbox next to the files, and select Commit.
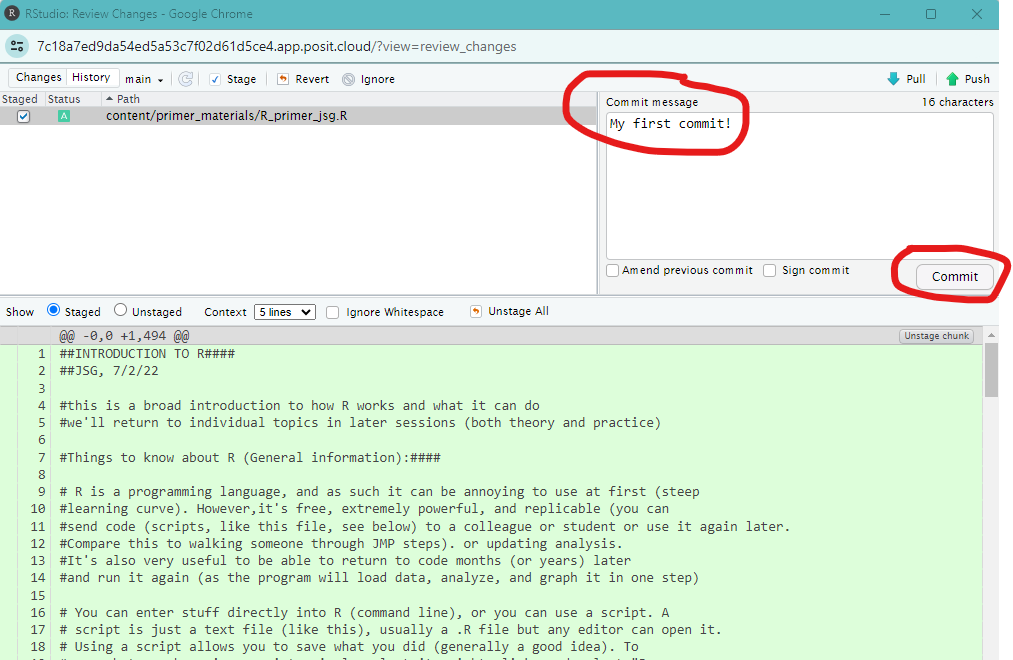
A pop-up window will appear. It shows what has changed in selected files in green (addition, all new here!) or red (removed, not shown here). You have to select boxes next to files(if not already done), enter commit message, and press commit. Try it now. Enter “My first commit!” and press Commit.
Potential error
If you get a screen that looks like this:
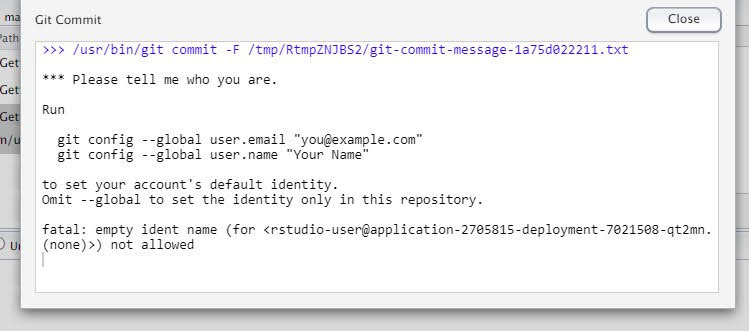
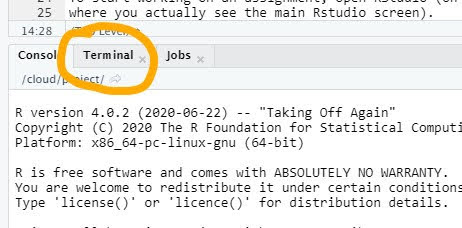
It just means we need to associate an identity with the commits. To do this, close (x) the git windows. Select the terminal tab:
Then paste this line into the terminal (tab to the right of the console tab), (note you need 2 – should be 2 dashes!)
git config –global user.email “you@example.com”
replace the email with your email (leave the quotes) and press enter.
Then paste this line into the terminal,
git config –global user.name “Your Name”
replace the Your Name with your name (leave the quotes) and press enter.
Now go back to the git window and try the commit again. It should work. You will only have to do this once (for desktop versions) and only occasionally for cloud-based RStudio instances.
Now you’ve committed to the file to your Rstudio instance (on your own machine or server), which is itself a git repository. Remember, this is different than a save. A save overwites the current file, while a commit compares changes you have made and tracks them. To see this, you can go the Git tab, select Diff, and then History on the pop-you. From there, you can select the commit, select any file you committed, and actually see the changes. This allows you to go back to (or just see) earlier versions easily, which is often helpful in programming.
Pushing to github
Now you need to push these changes to the cloud so I can see them (or, in the future, so you could share with collaborators or save a copy for yourself). Rstudio/posit Cloud warns you of this issue!
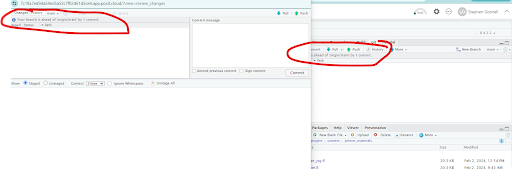
To fix this, press Push on the the pop-up window or git tab (the green arrow).
![]()
Potential error (very likely!)
As of Fall 2021, Github no longer accepts usernames and passwords for authentication. Github now requires a personal access token (PAT) instead. However, posit Cloud still asks for a password, not a PAT. If you enter your password or the incorrect PAT,your attempt to create a repository (or push commits to it) will fail with a message like this.
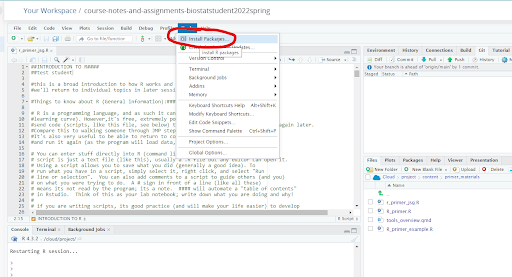
To create and use a token, we will use the usethis package. Here we also install a gitcreds package that can store the token on your machine (another option, and one that works very well if you install Rstudio on your own machine). To install them, first select Tools > Install Packages.
Then install the usethis and gitcreds packages.
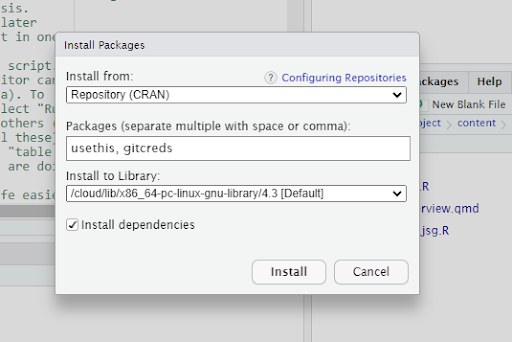
Enter these package names in the pop-up window, leave install dependencies checked, and click install. We will discuss this more in class, but in short R works off functions to run commands. Functions are short names for longer sets of instructions someone has written. Functions are stored in packages (sometimes called libraries). There are many, many of these, so some don’t come pre-installed/available with R. If you need those you have to install them once (per machine or project in posit Cloud).
Now go to the console area (lower left). This is one of the only things you’ll do directly there! We’ll talk about using scripts more.
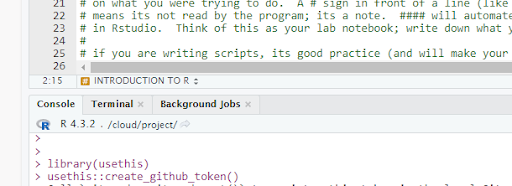
Next enter these commands and press enter. If this file is open in R, you can select the green triangle button (play icon) to run the current chunk. Otherwise you can copy and paste it into R.
This will launch a browser pointed to github. You may need to log in. Then it will have you name a PAT (personal access token). You can, for example, name it Rstudio. You can also set it to no expiration since you are only using it for this class (not a good idea in general for security reasons).
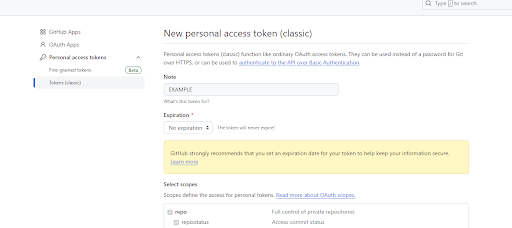
Scroll to the bottom of the page (leave everything else alone) and press generate token. A new screen will appear

Save the token somewhere (you’ll never see it again once you close the window). This is your PAT. If you press commit again now, you can enter your github username and this token; the commit process should then work.
You can also save the token to Rstudio, though this is less useful in positcloud (since every repository is like a new computer). To do this, go back to posit Cloud/Rstudio and run this code.
library(gitcreds)
gitcreds_set()
Select 3, then paste in the token you just generated and press enter.

This process is letting your computer and github communicate and should only need to be done once for a desktop. For rstudio.cloud, you will need to regularly reenter the token, but you don’t have to recreate it. So save you PAT somewhere just in case. If/when you lose it, however, you can simply make a new one and reconnect the repositories.
Once you enter your git credentials, try to push your changes again (press the green arrow). It should work this time.
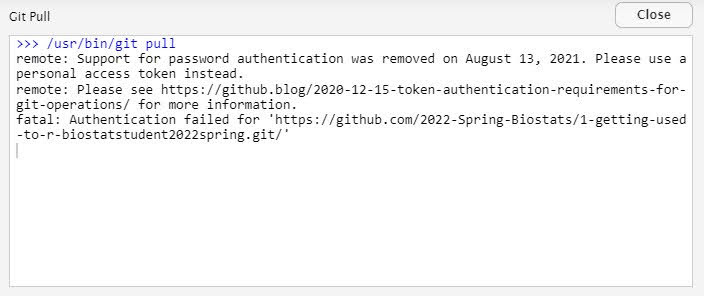
Potential error
One error that might appear when you try to push looks like this:

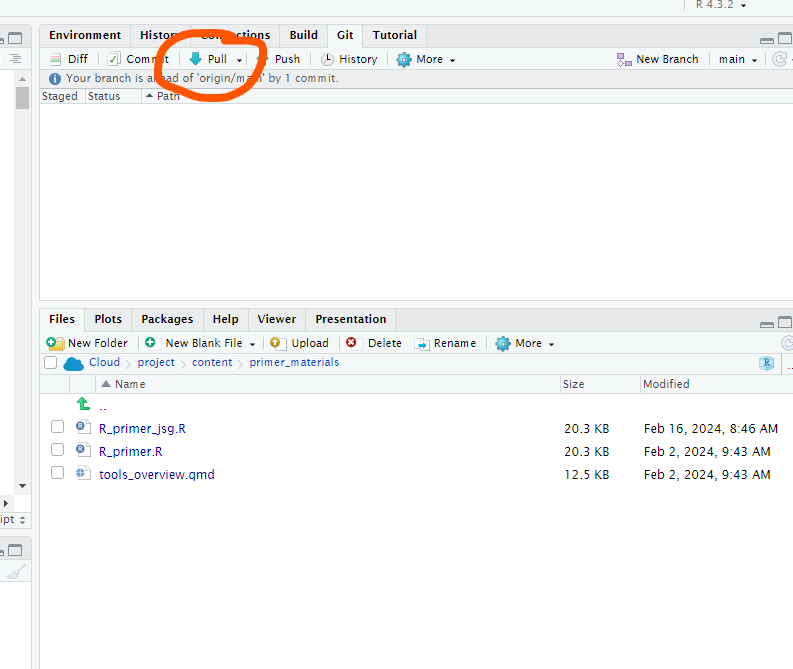
On the bright side, this error means github and Posit Cloud/Rstudio are talking. However, it also means your github-based clone has changed since you last synced it. To prevent merge errors, use the git pull button first, then try to push again.
You know push has worked when the warnings disappear!
You can also go to your github repository (on the web) and see the commits there.
As you work, use commits to save snapshots of your work in a version control manner, and pushes to share them. If you get stuck, you can also push your file up so I can see it and help you fix it (much better than “My code isn’t working). Then you can actually see”how” I fixed it. The code will also be useful for assessments.
References
Bryan, Jennifer. 2017. “Excuse Me, Do You Have a Moment to Talk about Version Control?” https://doi.org/10.7287/peerj.preprints.3159v2.
———. n.d. Happy Git and GitHub for the useR. https://happygitwithr.com/.
Fiksel, Jacob, Leah R. Jager, Johannna S. Hardin, and Margaret A. Taub. 2019. “Using GitHub Classroom to Teach Statistics.” Journal of Statistics Education 27 (2): 110–19. https://doi.org/10.1080/10691898.2019.1617089.